 in this tutorial I’ll going to show you some tricks which will result in a new usable
version of opensuses 2.6.37-rc5 upcoming kernel for 11.4 in older opensuse releases.
i tried this for the older 11.2 but the newer 11.3 might also work.
First you have to download the kernel-source.src.rpm. Yes you heart me right. You need this one
to unpack with rpm2cpio. Assuming you have save the kernel-source-src.rpm downloaded to
~/src/kernel doing
cd ~/src/kernel
rpm2cpio < kernel-source.src.rpm|cpio -id
and you should be left with the original kernel-source.src.rpm and the linux-2.6.36.tar.bz2,
a lot of patches and special files needed to build the package kernel-source.noarch.rpm but as i assure you we will use this for rebuilding the kernel suitable for installing on opensuse 11.2 or 11.3.
next we're creating the preparation base for patching the kernel source code.
tar xvfj kernel-source.tar.bz2
mkdir patches
mv patches*tar.bz2 patches/
cd patches/
for i in ls *; do tar xvjf $i;done
cd ..
Applying the patches is the next step. You should be able to see the apply-patches script. we will use this to apply all needed patches that ships with suse. The apply-patches script is used to patch the kernel in the correct order rather than doing each patch by hand. however if you ever run into a situation where you have do patch a kernel manualy you can fullfill this task using patch with the following syntax:
patch -d /PATH_TO_KERNEL_SOURCE
But in this case we closely run into trouble, as we dont know which patch have to be applied afer what. So i strongly recommend doing it the following way:
cd linux-2.6.36
../apply-patches ../series.conf ../patches/ i386
You may also use x86_64 instead of i386 here if you have a 64 bit capable system.
Now that we have successfully patched our kernel, we can begin with the actual build procedure.
As user root you should copy the linux-2.36 to /usr/src/linux-2.6.37-rc3-git6 directory and link that directory to /usr/src/linux .
cp -r linux-2.6.36 linux-2.6.37-rc3-git6
rm /usr/src/linux
ln -s /usr/src/linux-2.6.37-rc5 /usr/src/linux
The Suse Linux Kernel supports the /proc/config.gz file which holds the configuration setup for the current running kernel. So it seems to be a wise thing here making a clone copy of the actual existing configuration. So do as user root (after this step i assume you are the user root and have changed to the directory /usr/src/linux)
cd /usr/src/linux
zcat /proc/config.gz > .config
We can continue by doing a
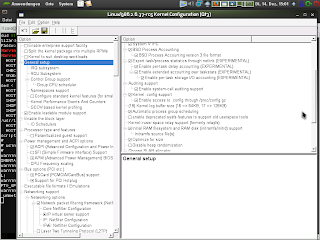
make xconfig

to start the configuration in a graphical user interface. Doing this you have to make sure that you ether have the qt3 development files or the qt4 development files. You can install them if they aren’t already in place by simply using opensuses tools for package management:
zypper in qt3-devel libqt4-devel
Uncheck the boxes "Enable enterprise support facility" since we don't need an enterprise kernel, "Split the kernel in multiple packages" since we want the kernel to be created as kernel-2.6.37-rc5.i386.rpm which can live next to our existing kernel. The Box "Kernel to suit desktop workloads" can also be unchecked but doesnt need to.
Unfortunately configuring the kernel is not an easy thing to do. You should study each option very clearly to understand what each option does and how it interacts with your hardware. It is mostly safe to use the suggested configration and leave the configuration in place as this represents the current configuration and should also work with your new kernel. The settings you might be aware of are:
"General Setup" --> "Local Version append to the kernel release".
Here you can give the Kernel a local Version like Test1 or your initials followed by a number.
In
"Processor Type and features"
you can build a kernel which fits perfectly to your machine. For example if you have a Pentium M Processor you should select Pentium M as Processor Type. You also can disable Xen support if you don't ever need this. Or you can set the timer frequency of the kernels scheduler system to your needs. Also i recommend to enable the kernels cgroup support when ever you see it which is new and really fastens up your system.
Caution setting up a configuration setting for a kernel is not a thing you do in five minutes. You really should take your time to make sure you understand what each configuration setting means even it took you 3 hours or more.
If you are done you can grep a caffe and type the following
make prepare && make modules_prepare && make rpm
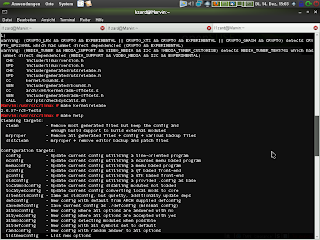
This will result in two rpms sitting in /usr/src/packages/rpm/SRPMS and /usr/src/packages/rpm/RPMS/i386. If you don't need the src.rpm in /usr/src/packages/rpm/SRPMS you rather want to use the make target binrpm-pkg, which will result only in the rpm /usr/src/packages/RPMS/i386. It may be helpful for you to look at make help to list all make targets
you can possible get. For example if you want to see whether your kernel name is set property you can use the make kernelrelease target.
If the package has successfully build you can finally install it using the rpm Command utility.
In my Case i need to upgrade my package from a former build and my make kernelrelease results in

linux-2.6.37-rc5-Test4
So i need to use
rpm -Uhv /usr/src/packages/RPMS/i386/kernel-2.6.37-rc5*.rpm
This will also install your kernel next to your default distribution kernel so you can choose which
one you want to boot into during grubs first stage and also you have a fallback if your kernel does
not work or not work as you expected it would.
Unfortunately this kernel rpm does not create and install a proper initial ram-disk you have do this by hand.
cd /boot
mkinitrd -k vmlinuz-2.6.37-rc5-Test4 -i initrd-2.6.37-rc5-Test4
Now you should find at least three new files residing here. The vmlinuz-2.6.37-rc5-Test4 or something with an other version number you may applied to, is the kernel you just created by compiling and installing the kernel. The initrd-2.6.37-rc5-Test4 is the initial ram-disk which you have created in the previous step. And the System.map-2.6.37-rc5-Test4 which is used to map modules before initialize the filesystem you are sitting on. So far all seems fine and by adding these lines to /etc/grub/menu.lst
1 title Kernel-Test
2 root (hd0,0)
3 kernel /vmlinuz-2.6.37-rc5-Test4 root=/dev/system/root resume=/dev/system/swap splash=silent quiet showopts vga=0x314
4 initrd /initrd-2.6.37-rc5-Test4
you can actually run your new kernel by restarting the computer.


